1. Installing Python
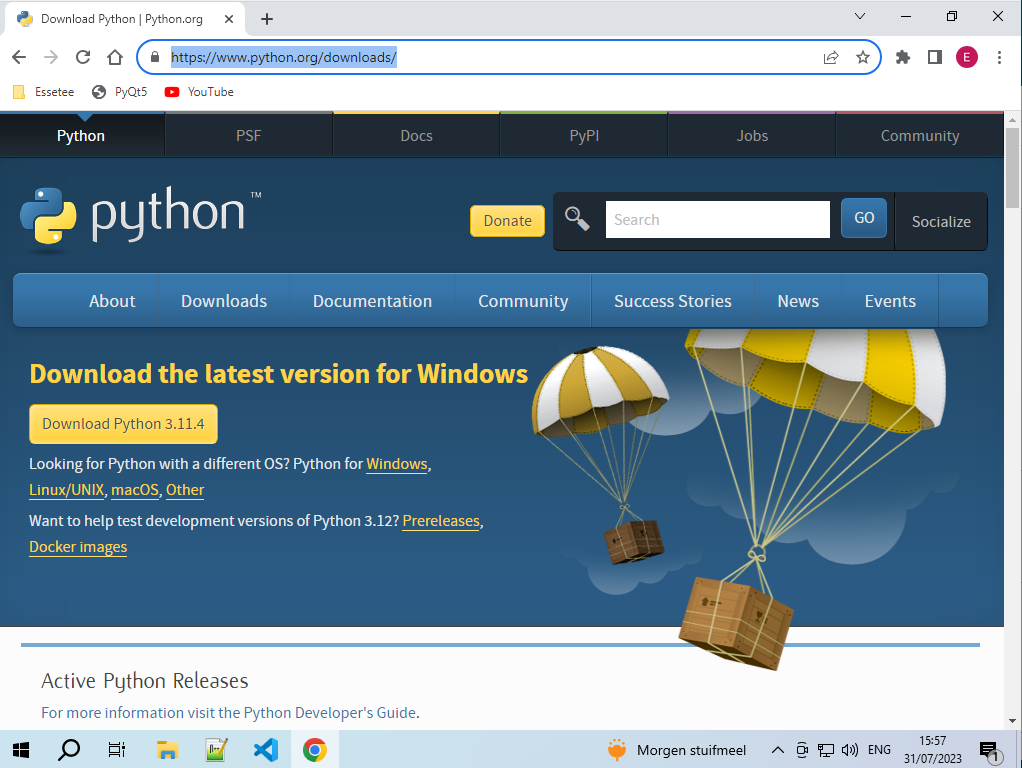
Surf to https://www.python.org/downloads/ and download the latest version of Python.
After the download is complete, run the installer. Before you click on Install Now : check Add Python.exe to PATH. This will save you a lot of troubles.
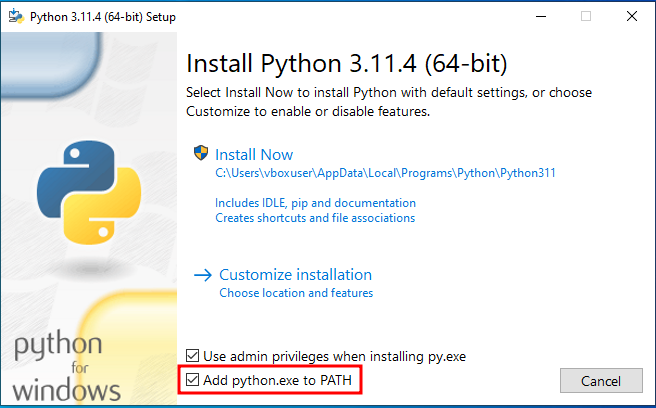
After you checked the PATH variable, click on Install Now to start the installation of python. If you see Setup Complete, you can close the installer. Python is now installed on your computer with all the tools you need. It comes already with a python editor Idle that you can find back in your start menu.
2. Choosing the right editor
If you google for editors, you will see that there are many text editors to use with python. I have use 2 editors that are free to download and use:
Goto https://code.visualstudio.com/download and click on the big blue button to download vscode for windows.
After downloading, just run the installer.
The best way to start with python, is to make a virtual environment. In the virtual environment you can install all the libraries you want, without it will interfere with older of newer versions of Python on your system. I will explain later how to accomplish that with Vscode. That’s where our other python text editor comes to look around the corner.
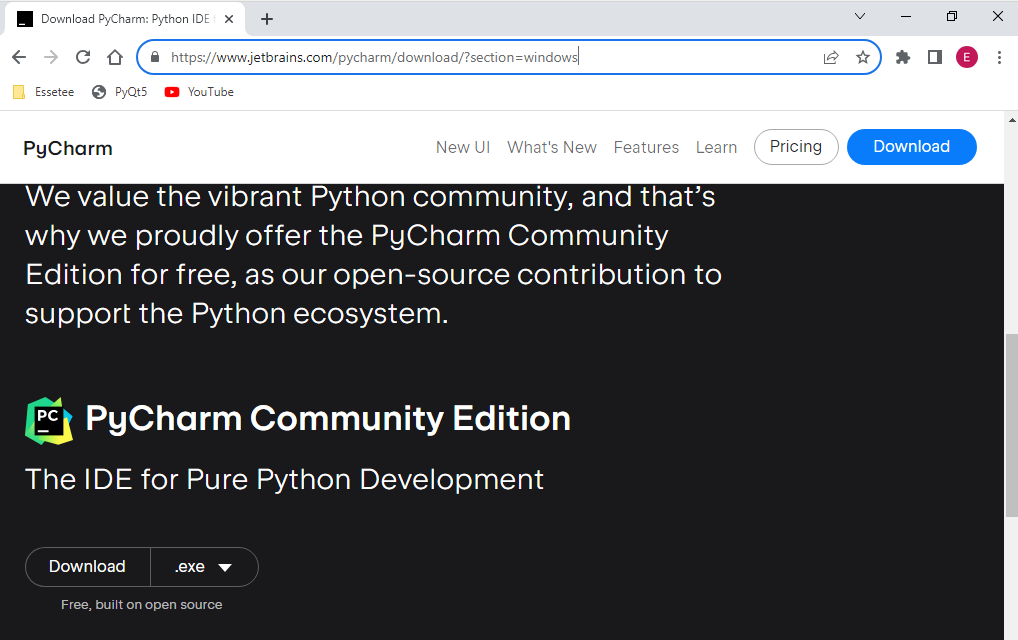
Goto https://www.jetbrains.com/pycharm/download/?section=windows, scroll down and download the community version.
Run the installer after the download finished. This is a great IDE for Python. It’s very helpful for new python developers. it will setup a complete virtual environment for you if you start a new project. I will also explain later how to use Pycharm.
3. Making Windows 10 ready for Python
Python is what we call, a scripting language. However, the standard settings of Windows will not allow you to execute python scripts. If you try it, you will get an error as: Activate.ps1 cannot be loaded because running scripts is disabled on this system. If you then go search on the internet to resolve that problem, you will see a lot of solutions for this problem. For some solutions you need to be a super geek to resolve it. I will learn you how to do that on an easy way. It’s so easy that you not even find this solutions on the internet. Everyone wants to show how smart they are.
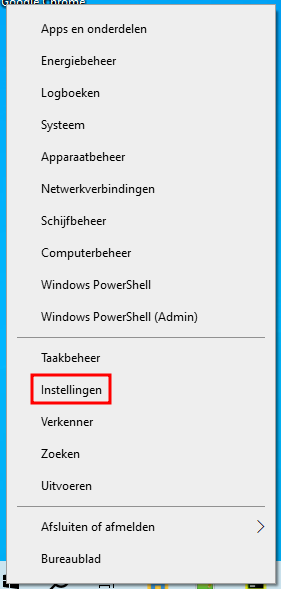
Here the solution: Click with your right button on the windows start menu and choose settings.
In the next window choose the updates category.

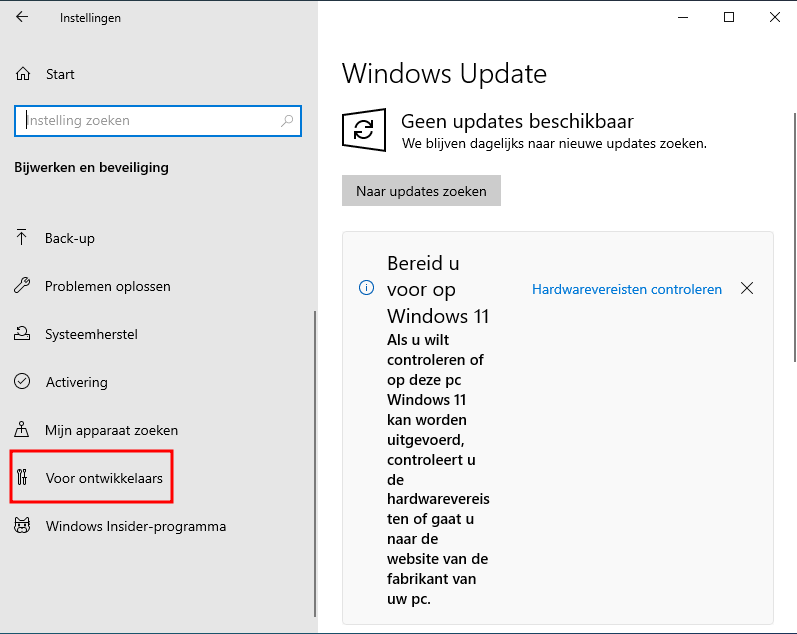
Then next click on For Developers.
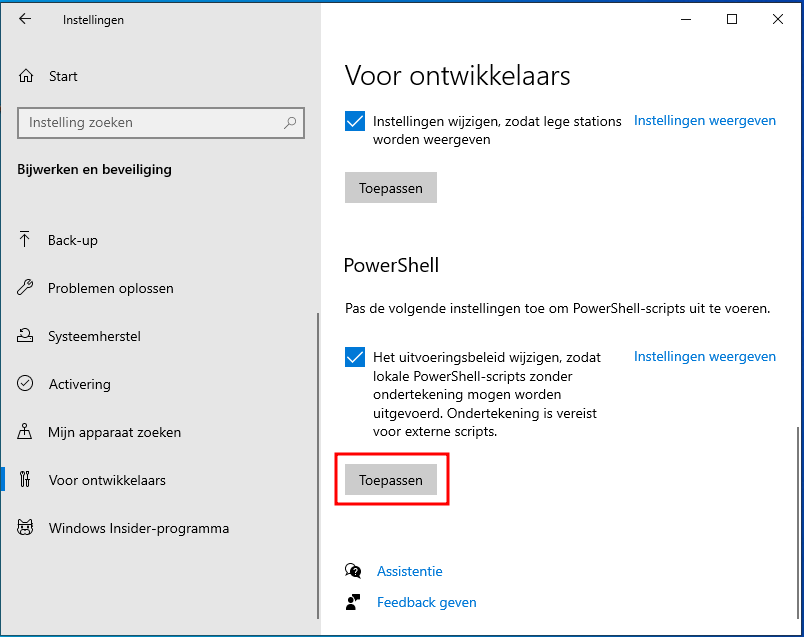
In the next window scroll down till you see powershell and click on apply.
Sorry for the pictures from a Dutch Win10 installation.
You can now close the window. From now on, you will be able to execute python scripts. With our 2 editors installed, let’s start with the easiest one: Pycharm.
Under windows 11, open a powershell with admin rights and write: set-Execution-Policy Unrestricted. After stopping with coding it's best practice to run set-Execution-Policy Restricted again. Leaving Unrestricted is a potential risc. It's far more safer to coding in wsl, a dev container or virtual machine (Vmware, Virtualbox).
4. Pycharm Community Edition
Start the Pycharm editor, accept the license and in the next window you can choose to send anonymous statics or not. I always enable sending anonymous statics, because it helps the developers to give us a very good product. But the choice is yours. Then you will be greeted with the following interface.
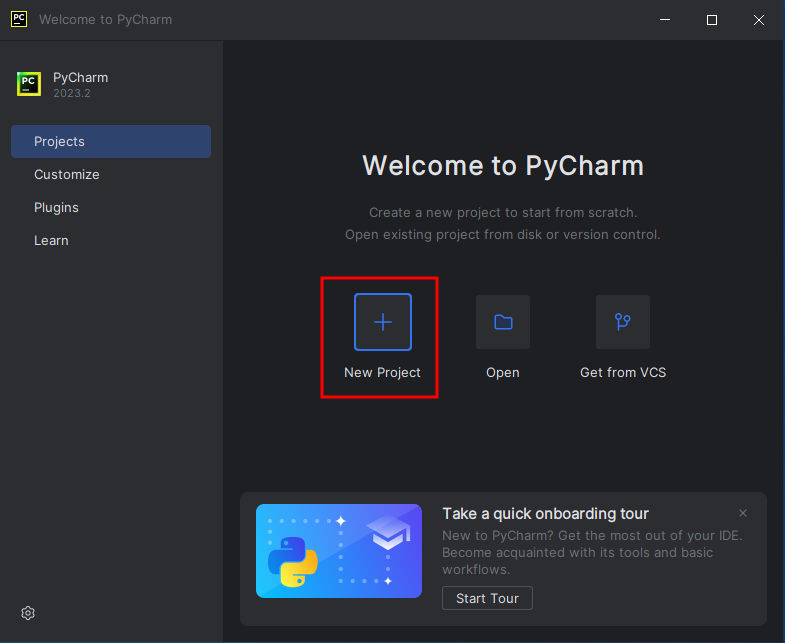
Let’s hit the New Project button and see the options we get.
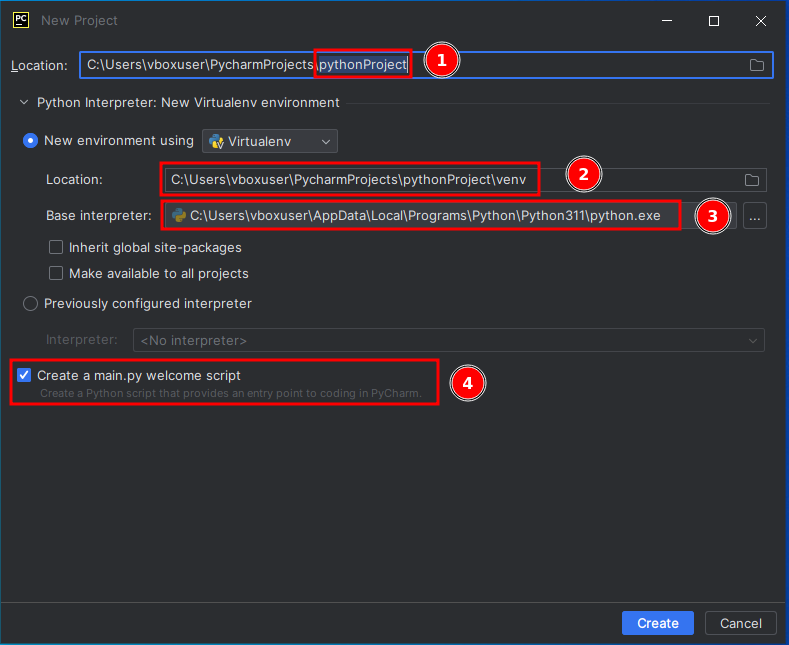
The only things you need to change are 1 and 4. Don’t touch 2 and 3! But for the moment, just accept the defaults to start our 1st python project. Click on the create button.

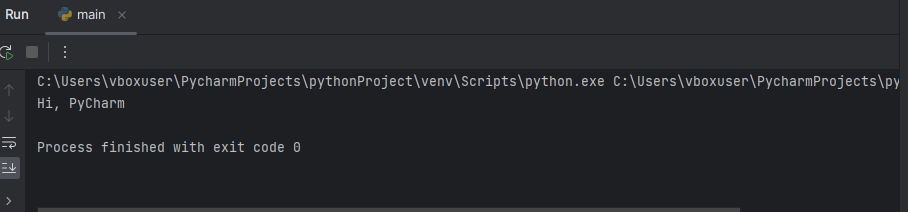
Mac users are in love with Sublime Text. Why ? I think because they are used to pay for everything on a mac. (more money than brains) Sublime text isn’t free to use and you have no terminal. A mac user need to open a terminal and navigate to the folder where the code is. Every time they run the code they have to switch to the terminal to see the execution. Here in Pycharm (and also in Vscode) we have an embedded terminal. Don’t check the code and try to understand, just hit the run button(1) to execute the main.py file.
As you see, the code executed without errors and greets with Hi, PyCharm.
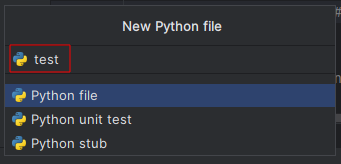
Now right click on PythonProject and add a new Python File. After clicking on the Python File give it a name test.
In the text editor type now: print("Hello World!)" As you see now, you can’t run the code with a click on the green button, because it still says main. It’s easy to change that main into the file you want to run. Right click on the test.py file and choose Run test.
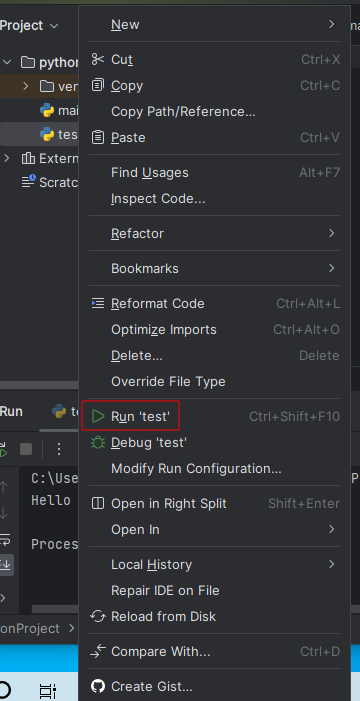
As you can see, in the main menu, main has changed to test. From now on you can add code and run the test.py file. That’s a simple example on how to switch files to run.
So far Pycharm, it’s an excellent editor to write python code. But my favorite one is VScode.
5. Visual Studio Code
VScode is a great IDE to use. I write also non-python code like PHP, C, C++, Java … VScode can handle more than Python. The good part of IDE’s, is intellisense to auto-complete code. Therefore to start with VScode and python, we need to install the Python Intellisense code into VScode. There are a lot of helpers for VScode. If you work together with other coders on an application, then setup a docker environment is preferable. VScode just has all the tools.
Let’s fire up VScode.
1. Choose your style
2. Close the Welcome page.
After closing the welcome page you are presented with a blank interface with some buttons on the left side. Click on the button labeled with 1 in the screenshot.
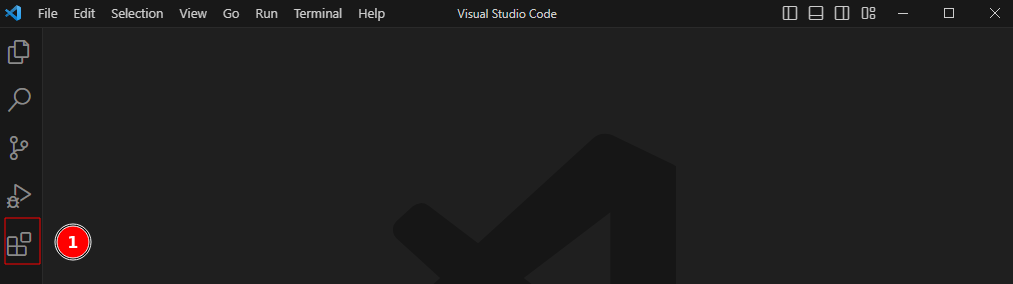
As soon as you click on the button, vscode starts to load some examples of plugins you can add to vscode. And the 1st one is Python.
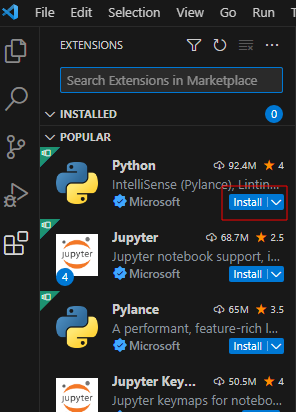
Click now on the install button.
After the install is complete, click on the button Open new project folder. VScode will start in your user folder and you will see your PycharmProject folder.
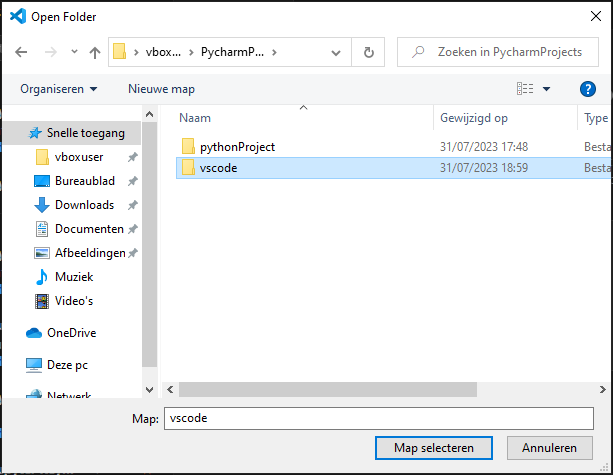
Double click that folder and in the new window, make a new folder with the name vscode and choose to select that folder.
After you have selected the folder, click now in the menu on Terminal and choose to open a new terminal.
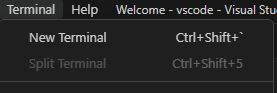
After you clicked on New Terminal, your screen will resample as the screenshot.

Where you see the 1, that’s your command prompt in vscode. Now we need to make a virtual environment for our python code. Click in the terminal window and type: python.exe -m venv .venv and press enter. The second venv has a dot at the beginning! After the command finished, you get your prompt back (1) and you see that you have now a new folder in you vscode folder named .venv. (2)
Now it’s time to activate our virtual environment. Click in the terminal window and type: .\.venv\Scripts\activate and hit Enter key. To type, start typing ./ven and wait a little bit and then powershell will adjust the path (will put the .\ in front), then hit the Tab key, it will auto complete to .\.venv\ then hit the S key and then hit back the Tab key, it will complete now to .\.venv\Scripts\ and now hit the a key and then hit the Tab key again and it will auto complete the command, now hit the Enter key to execute the command. Your prompt in the terminal will change now to something like that: (.venv) PS C:\Users\vboxuser\PycharmProjects\vscode> As you see, you now have the (.venv) at the beginning of the prompt that let’s you know that you are inside a virtual environment. Now we need to tell vscode that he needs that virtual environment to run the python code. Click on the icon(1) and choose the option Command Palette.

In the command palette start typing Select Int
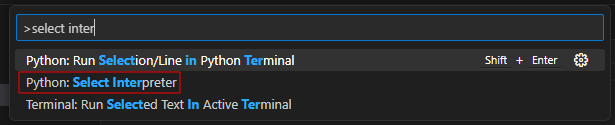
and select Python: Select Interpreter
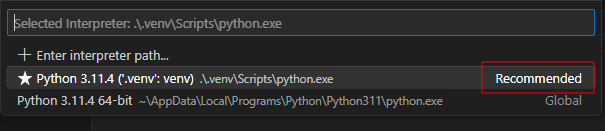
Then choose the recommended option, vscode has detected your virtual environment.
Now you are done. It’s a bit harder than Pycharm to configure but we done it. To check if everything is OK, close the terminal window by clicking on the trash icon and open a new one. The (.venv) should be there at the start of the command prompt.
That was the hard way. Most of the time if you start a new project, as soon as you make your virtual environment (python.exe -m venv .venv) vscode will popup a window at the under right corner if you wish to set this environment to use with your project. Click on yes and you're done.If not, you know the hard way.
If you now click on the split icon in the terminal the terminal will split and you can adjust the width of the terminal. This is a handy feature if you work with Django or Fastapi where you can watch if there are errors in the python server that you will run.

If you now hoover over vscode you can add files or folders to your project.

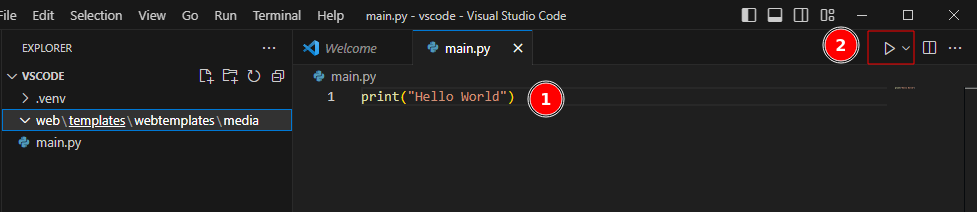
Add a file main.py to your project. You can also add files or folders by clicking in the empty space under .venv folder, blue lines will appear to show you where you are, and then just right click and choose New File or New Folder. Tip: if you want a new folder with subfolders you can just enter all at once. Example web/templates/webtemplates/media.
If you want to add files to a folder, just right click on the folder name and choose New File. In the editor write the code print(“Hello World”), hit ctrl+s to save the file and then push the button (2) to run your code. In the terminal you will see Hello World.
There’s a lot of information to use vscode online. I learned you the basics to start with python. As vscode is one of the most used editors, it’s easy to find key combinations online to deal with daily use of vscode.